
SageMaker Model MonitorとSageMaker Clarifyを使用して、ML監視を実践してみます。
本文中コード: https://github.com/nsakki55/code-for-blogpost/tree/main/sagemaker_model_monitoring
ML監視
MLモデルの予測性能は、データと密接に関わっています。
本番環境のMLモデルの予測精度が劣化している要因の一つに、「学習データと推論データの分布が異なる」状況が考えられます。
このようなデータ分布の変化を「データドリフト」とML監視の文脈では呼びます。
変化の比較データとして、以下2つの組み合わせがよく取り上げられます。
- 学習データと推論データの分布の変化
- ベースライン:学習データの統計量
- 比較対象:推論データの統計量
- 推論データの時系列での分布の変化
- ベースライン:直近の推論データの統計量
- 比較対象:現在の推論データの統計量
自前でデータドリフトの監視機能を導入する場合、推論データを貯める機能や、学習データと本番データの統計量を比較する機能が必要があります。
SageMaker Model Monitorはデータドリフト監視機能のマネージドサービスで、推論データをS3上に保持し、データの統計量の計算を自動で行ってくれます。
参考:Amazon SageMaker Model Monitor を活用したデータドリフト検知の解説 | Amazon Web Services ブログ
MLの予測値を監視する場合「予測値が歪みがないか」「どの特徴が予測に寄与しているか」が見る項目の一つに取り上げられます。
学習データに偏り(バイアス)がある場合、MLモデルの予測値は意図しない歪みが生じます。
MLモデルを運用し続けると、予測に寄与する特徴量が変化するため、特徴量選択を継続的に行なっていく必要があります。
SageMaker Clarifyを使用することで、上記のバイアス検出・特徴量の寄与度を自動で計算してくれます。
参考: バイアスの検出とモデルの説明可能性 – Amazon Web Services
MLOpsで取り上げられる監視テーマは広く、今回取り上げる監視項目は一部でしかありません。
監視についてはMLOps Principlesで幅広く取り上げられています。
前準備: モデル学習
kaggleのavazu-ctr-predictionデータセットを学習データとして使用し、モデルに SGDClassifier を用います。
SageMakerで学習ジョブを実行する方法はこちらの記事で解説しています。
- 学習データをS3に保存
# train, test データを用意
df_train = pd.read_csv(os.path.join(DATA_FOLDER_PATH, "train_partial"), dtype="object")

# S3にアップロード
prefix = 'model-monitoring'
train_file = "train.csv"

df_train.to_csv(train_file, index=False)
s3_resource_bucket = boto3.Session().resource("s3").Bucket(bucket)
s3_resource_bucket.Object(os.path.join(prefix, "train", train_file)).upload_file(train_file)
- カスタムコンテナを用いてSageMaker上で学習
output_location = f"s3://{bucket}/{prefix}/output"
s3_train_data = f"s3://{bucket}/{prefix}/train/{train_file}"
inputs = {"train": s3_train_data}

timestamp = strftime("%Y%m%d-%H-%M-%S", gmtime())
job_name = "model-training-job" + timestamp

estimator_parameters = {
    "entry_point": "trainer.py",
    "source_dir": "model",
    "framework_version": "0.23-1",
    "py_version": "py3",
    "instance_type": train_instance_type,
    "instance_count": 1,
    "hyperparameters": hyperparameters,
    "output_path": output_location,
    "role": role,
    "base_job_name": job_name,
}
model_estimator = SKLearn(**estimator_parameters)
model_estimator.fit(inputs)
- SageMakerにモデル登録
model = SKLearnModel(
    role=role,
    model_data=model_estimator.model_data,
    framework_version="0.23-1",
    py_version="py3",
    source_dir="model",
    entry_point="inference.py",
    sagemaker_session=sess
)

model_name = "{}-{}".format("monitoring-model", timestamp)

sess.create_model(
    model_name,
    role,
    model.prepare_container_def(
        instance_type='ml.t2.medium'
    )
)
Model Monitor
データキャプチャ
SageMaker Model Monitorを使用して、学習データと推論データのドリフトを検出する場合、SageMaker Endpointを利用する必要があります。
Endpointのデプロイ設定に data_capture_config を設定することで、推論データが自動でS3に保存されるようになります。
from sagemaker.model_monitor import DataCaptureConfig

endpoint_name = 'model-monitor-endopoint' + strftime("%Y-%m-%d-%H-%M-%S", gmtime())
data_capture_prefix = "{}/datacapture".format(prefix)
s3_capture_upload_path = "s3://{}/{}".format(bucket, data_capture_prefix)

# データキャプチャーの設定
data_capture_config = DataCaptureConfig(
                        enable_capture = True,
                        sampling_percentage=50,
                        destination_s3_uri=s3_capture_upload_path,
                        kms_key_id=None,
                        capture_options=["REQUEST"],
                        csv_content_types=["text/csv"],
                        json_content_types=["application/json"]
                        )

predictor = model.deploy(initial_instance_count=1,
                instance_type="ml.t2.medium",
                endpoint_name=endpoint_name,
                data_capture_config=data_capture_config
                )

predictor = Predictor(endpoint_name=endpoint_name)
データキャプチャが機能してることを確認するために、推論エンドポイントにリクエストを投げます。
runtime = boto3.Session().client('sagemaker-runtime')

with open('test_partial.csv') as f:
    for i, line in enumerate(f):
        response = runtime.invoke_endpoint(EndpointName=endpoint_name,
                                   ContentType='text/csv',
                                   Body=line,
                                   Accept='application/json'
                                   )
S3に推論データが保存されていることを確認できます。
# fileチェック
s3_client = boto3.Session().client('s3')
current_endpoint_capture_prefix = '{}/{}'.format(data_capture_prefix, endpoint_name)
result = s3_client.list_objects(Bucket=bucket, Prefix=current_endpoint_capture_prefix)
capture_files = [capture_file.get("Key") for capture_file in result.get('Contents')]
print(capture_files)
# model-monitoring/datacapture/model-monitor-endopoint2022-11-25-01-20-23/AllTraffic/2022/11/25/01/26-44-116-4fc56cc8-d743-438f-9220-9b391ae43676.jsonl
# model-monitoring/datacapture/model-monitor-endopoint2022-11-25-01-20-23/AllTraffic/2022/11/25/01/37-20-753-04d1982c-0320-42a4-9b56-d099478b1e53.jsonl
# model-monitoring/datacapture/model-monitor-endopoint2022-11-25-01-20-23/AllTraffic/2022/11/25/01/38-20-865-2dcb9a51-66c8-48b6-9550-bcf2d7cfb664.jsonl


capture_file = s3_client.get_object(Bucket=bucket, Key=capture_files[-1]).get("Body").read().decode("utf-8")
print(json.dumps(json.loads(capture_file.split("\n")[0]), indent=2))
# {
#   "captureData": {
#     "endpointInput": {
#      "observedContentType": "text/csv",
#      "mode": "INPUT",
#      "data": "1.0807444605793397e+19,0,14102405,1005,1,856e6d3f,58a89a43,f028772b,ecad2386,7801e8d9,07d7df22,a99f214a,66a9be9c,684581ce,1,0,21981,320,50,2532,0,679,100077,48\n",
#      "encoding": "CSV"
#    }
#  },
#  "eventMetadata": {
#    "eventId": "4a8a5ed9-6393-432c-8295-35b272ade59f",
#    "inferenceTime": "2022-11-24T11:07:53Z"
#  },
#  "eventVersion": "0"
#}
baselineデータ作成
データドリフトを計算するために、ベースラインとなるデータの統計量を計算する必要があります。
DefaultModelMonitorクラスを使用して、データドリフトの計算を行います。
baseline_datasetに学習データのS3パスを指定します。
from sagemaker.model_monitor import DefaultModelMonitor
from sagemaker.model_monitor.dataset_format import DatasetFormat

my_default_monitor = DefaultModelMonitor(
    role=role,
    instance_count=1,
    instance_type="ml.m5.large",
    volume_size_in_gb=20,
    max_runtime_in_seconds=3600,
)
baseline_results_uri = f"s3://{bucket}/{prefix}/model_monitor/results"
my_default_monitor.suggest_baseline(
    baseline_dataset=s3_train_data,
    dataset_format=DatasetFormat.csv(header=True),
    output_s3_uri=baseline_results_uri,
    wait=True
)
suggest_baseline を実行するとSageMaker Processing Jobが実行され、学習データの統計量が計算されます。
以下のファイルが実行結果としてS3に出力されます
参考: ベースラインの作成 - アマゾン SageMaker

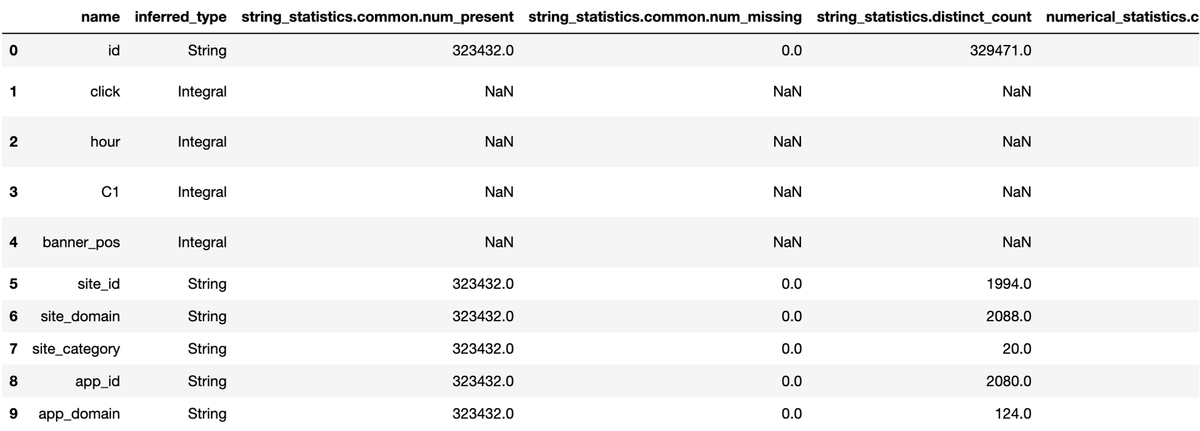
statistics.jsonの中身を確認
baseline_job = my_default_monitor.latest_baselining_job
schema_df = pd.json_normalize(baseline_job.baseline_statistics().body_dict["features"])
schema_df.head(10)
constraints.jsonの中身を確認
constraints_df = pd.json_normalize(baseline_job.suggested_constraints().body_dict["features"])
constraints_df.head(10)

スケジュール設定
データキャプチャした推論データと、ベースラインの学習データのドリフトの計算を実行する場合、Model Monitorの実行スケジュールを作成する必要があります。
baselineデータ作成時の DefaultModelMonitor の create_monitoring_scheduleメソッドで、スケジュール設定を行うことができます。
ドリフト計算の実行間隔は model monitorが提供してるCronExpressionGeneratorで設定します。
ドリフト計算は設定した時間経過後に実行されるため、実行開始まで待つ必要があります。
from sagemaker.model_monitor import CronExpressionGenerator

monitor_schedule_name = 'ctr-prediction-monitoring'
s3_report_path = f's3://{bucket}/model_monitor/monitoring_report'
my_default_monitor.create_monitoring_schedule(
    monitor_schedule_name=monitor_schedule_name,
    endpoint_input=predictor.endpoint,
    output_s3_uri=s3_report_path,
    statistics=my_default_monitor.baseline_statistics(),
    constraints=my_default_monitor.suggested_constraints(),
    schedule_cron_expression=CronExpressionGenerator.hourly(),
    enable_cloudwatch_metrics=True,
)
SageMaker Processing Jobとしてデータドリフト計算が実行されます。
S3にはstatisitcs.json, constraints.jsonに加え、ベースラインデータと推論データのドリフト結果のconstraint_violations.jsonが出力されます。

constraint_violations.jsonの中身を確認。
検出される異常は以下の6種類があります
- data_type_check : ベースラインデータとデータ型が一致してるか
- completeness_check : 非nullのデータ割合が閾値以上か
- baseline_drift_check : ベースラインデータとのダイバージェンス(Kolmogorov–Smirnov 検定)
- missing_column_check : ベースラインデータの列数より少ないか
- extra_column_check : ベースラインデータの列数より多いか
- categorical_values_check : ベースラインデータに含まれない特徴の数が閾値以上か
参考: 違反のスキーマ (constraint_violations.json ファイル) - アマゾン SageMaker
今回はdata_type_checkでのみ違反が出ています。
{'violations': [
  {'feature_name': 'device_ip',
   'constraint_check_type': 'data_type_check',
   'description': 'Data type match requirement is not met. Expected data type: String, Expected match: 100.0%. Observed: Only 98.08917197452229% of data is String.'},
  {'feature_name': 'site_domain',
   'constraint_check_type': 'data_type_check',
   'description': 'Data type match requirement is not met. Expected data type: String, Expected match: 100.0%. Observed: Only 99.71048060220035% of data is String.'},
]}
Clarify
バイアス検出
SageMaker Clarifyで学習データ中のバイアスを検出します。
Clarifyによるバイアス検出はSageMaker Processing Jobを実行することで行います。そのため、Processing Jobの実行インスタンスサイズを設定します。
SageMakerClarifyProcessorクラスを利用して、Clarifyによるバイアス検出を行います。
from sagemaker import clarify

clarify_processor = clarify.SageMakerClarifyProcessor(
    role=role, instance_count=1, instance_type="ml.m5.xlarge", sagemaker_session=sess
)
バイアス検出を実行する際に、以下の設定を渡す必要があります。
- DataConfig
- ModelConfig
- ModelPredictedLabelConfig
- BiasConfig
DataConfigではバイアス計算を行う学習データを指定します。
bias_report_output_path = "s3://{}/{}/clarify-bias".format(bucket, prefix)
bias_data_config = clarify.DataConfig(
    s3_data_input_path=s3_train_data,
    s3_output_path=bias_report_output_path,
    label="click",
    headers=df_train.columns.to_list(),
    dataset_type="text/csv",
)
Clarifyによるバイアス検出の際に、一時的に推論エンドポイントを立てて予測値を取得します。
ModelConfigで推論エンドポイントを立てるための設定を行います。
ModelPredictedLabelConfigで推論エンドポイントからの返却型から予測値を取得するための設定を行います。
model_config = clarify.ModelConfig(
    model_name=model_name,
    instance_type="ml.m5.xlarge",
    instance_count=1,
    accept_type="text/csv",
    content_type="text/csv"
)

predictions_config = clarify.ModelPredictedLabelConfig(probability_threshold=0.5)
BiasConfigでバイアスを調べたい特徴を設定します。
bias_config = clarify.BiasConfig(
    label_values_or_threshold=[1], facet_name="banner_pos", facet_values_or_threshold=[0], group_name="C1"
)
run_bias メソッドを実行することで、バイアス検出のProcessing Jobが実行されます。
clarify_processor.run_bias(
    data_config=bias_data_config,
    bias_config=bias_config,
    model_config=model_config,
    model_predicted_label_config=predictions_config,
    pre_training_methods="all",
    post_training_methods="all",
)
S3にバイアス検出の結果が出力されます。
json形式に加え、html, jupyter notebook, pdf形式でレポートが出力されます。

SageMaker StudioからClarifyの結果を確認することができます。

特徴量の寄与度
Clarifyでは特徴量の寄与度の指標にSHAPを利用することができます。
SHAP計算を実行する際に、以下の設定を渡す必要があります。
- ModelConfig
- DataConfig
- SHAPConfig
ModelConfigで一時的に利用する推論エンドポイントの設定を行います。今回はバイアス計算で使用した設定をそのまま利用します。
DataConfigでSHAPを計算するデータの設定を行います。
explainability_output_path = 's3://{}/{}/clarify-explainability'.format(bucket, prefix)
explainability_data_config = clarify.DataConfig(s3_data_input_path=s3_train_data,
                                s3_output_path=explainability_output_path,
                                label='click',
                                headers=df_train.columns.to_list(),
                                dataset_type='text/csv')
SHAPConfigでSHAP計算の設定を行います。
shap_config = clarify.SHAPConfig(baseline=None,
                                 num_samples=35,
                                 agg_method='mean_abs',
                                 save_local_shap_values=False)
run_explainability でSHAP計算をSageMaker Processing Jobとして実行します。
clarify_processor.run_explainability(data_config=explainability_data_config,
                                     model_config=model_config,
                                     explainability_config=shap_config)
バイアス検出と同様、S3に結果がレポートとして出力されます。

SageMaker Studio上でもSHAP値を確認することができます。

まとめ
SageMaker Model Monitor, SageMaker Clarifyを使ってみました。
SageMaker Endpointの利用が前提となっているため、SageMakerでML基盤を構築していないと利用できないので注意してください。