
ControlFlowとは
Prefect社が2024年6月に公開した、LLM Agentワークフローを構築するOSSのPythonフレームワークです。
公式リリース記事: Agentic LLM Workflows | ControlFlow by Team Prefect
上記事ではLLMを含むワークフローの構築には、3つの課題が存在すると指摘してます。
- オーケストレーション
- 可観測性
- 制御・信頼
これらの問題に対処するため、ControlFlowが登場しました。
CotrolFlowは大まかに以下の動作を行います
- LLMが解決するための観察可能な個別Taskを作成
- 各Taskに1つ以上の専門Agentを割り当て
- TaskをFlowに組み合わせて、複雑な動作を編成
ControlFlowは初回リリース前の開発段階にあると、GitHubのREADMEに書かれています。
🚨🚧 Please note that ControlFlow is under active development ahead of its initial public release!🚧🚨
今後の開発状況がどうなるか不確定な要素が多いため、利用する場合はご注意ください。
github.com
主要概念
ControlFlowのコアコンセプトはTask, Agent, Flowの3つの概念です。
公式Document : Core Concepts - ControlFlow
Task
LLMを活用したアプリケーションの特定の目的を表します。
Taskクラスを使用して、タスクの目的・プロンプト・Agent・他タスクとの依存関係・結果のデータ型などを明示的に定義できます。
from controlflow import Task

interests = Task(
    objective="Ask user for three interests",
    result_type=list[str],
    user_access=True,
    instructions="Politely ask the user to provide three of their interests or hobbies."
)
Agent
Taskを実行を行うAIワーカーと説明されています。
TaskとAgentの役割は次のように区別できます。
- Tasks define WHAT needs to be done
- Agents determine HOW it will be done
Tasks and/or Agents - ControlFlow
以下の例ではsearch_web、generate_plotというツールを使える DataAnalyst というAgentが Analyze sales data Taskを実行します。
from controlflow import Agent, Task

data_analyst = Agent(
    name="DataAnalyst",
    description="An AI agent specialized in data analysis",
    instructions="Perform data analysis tasks efficiently and accurately",
    tools=[search_web, generate_plot],
    model=gpt_35_turbo,
)

task = Task(
    objective="Analyze sales data",
    agents=[data_analyst]
)
Flow
FlowはLLMを活用したワークフローをカプセル化し、オーケストレーションする高レベルのコンテナを表します。
依存関係に基づいてタスクの実行順序を管理します。
from controlflow import flow

@flow
def data_processing_flow():
    data = load_data()
    cleaned_data = clean_data(data)
    insights = analyze_data(cleaned_data)
    return insights
料金
ControlFlowはOSSであるため、ControlFlow自体の料金はかかりません。
内部で使用するOpenAI APIやAnthropic API等の利用料金がかかります。
ControlFlowはPrefect Cloudと統合されているため、Prefect Cloudの料金がかかります。
インストール
公式Document : Installation & Setup - ControlFlow
ControlFlowはPython 3.9以上に対応しています。
pipでinstallする場合
$ pip install -U controlflow
今回はryeでinstallしました
$ rye add controlflow
$ rye sync
内部で外部のLLM APIを使用します。デフォルトではOpenAI APIが使用されます。
今回はOpenAI APIを使用します。
$ export OPENAI_API_KEY="your-api-key"
現在はOpenAI, Azure OpenAI, Anthropic, GoogleのAPIがサポートされています。
Configuring LLMs - ControlFlow
実行するモデルタイプを指定します。OpenAI APIを利用する場合、デフォルトではgpt-4oが設定されています。
$ export CONTROLFLOW_DEFAULT_LLM='openai/gpt-3.5-turbo'
Tutorialをやってみる
公式Documentにチュートリアルがあるので、動かしてみます。
Tutorial - ControlFlow
Hello, world
helloを出力するTaskを作成します。
TaskにAgentを明示的に渡さない場合、デフォルトのAgentが内部では使用されます。
Configuring Default Agents - ControlFlow
runメソッドを呼び出すことでTaskが実行されます。
Flowを明示的に作成していない場合、一時的なFlowが自動作成されます。
Tasks - ControlFlow
import controlflow as cf

hello_task = cf.Task("say hello")
print(hello_task.run())
実行するとHello!という値が出力されます。
❯ rye run python hello_world.py
╭─ Agent: Marvin ──────────────────────────────────────────────────────────────────────────────────╮
│                                                                                                  │
│  ✅ Tool call: "mark_task_e37e2_successful"                                                      │
│                                                                                                  │
╰────────────────────────────────────────────────────────────────────────────────────  4:12:36 PM ─╯
Hello!
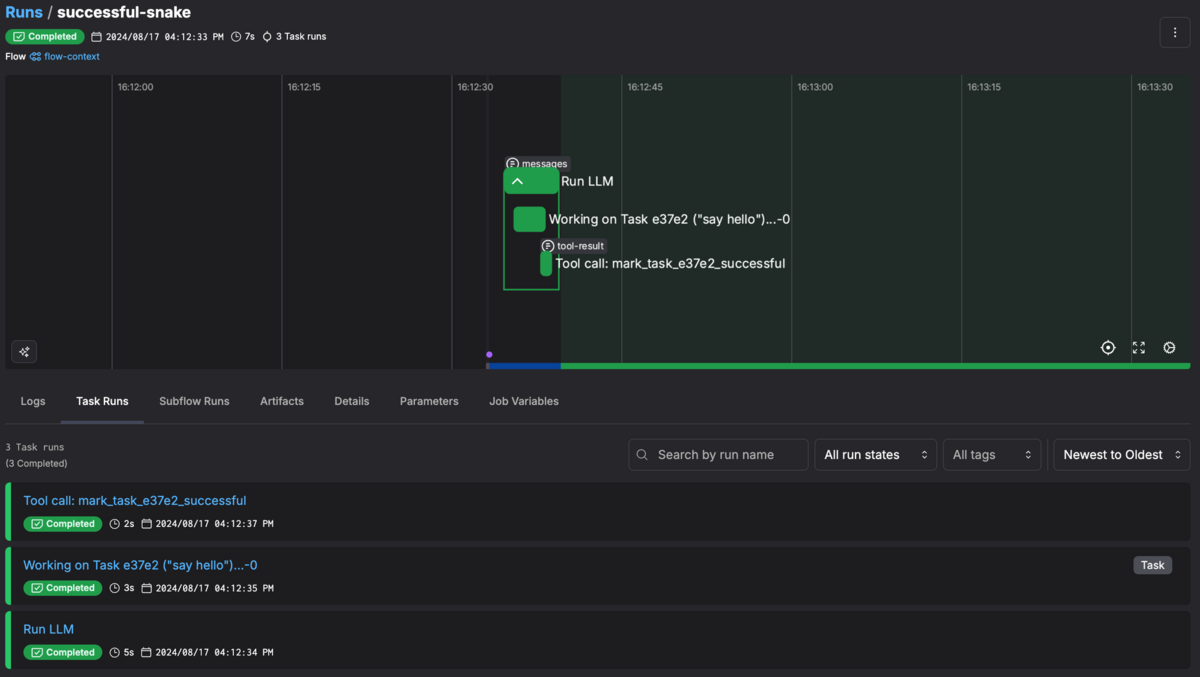
Prefect Cloud上で実行の詳細を確認できます。
Hello, user
ユーザーからの入力をAgentに渡すことができます。
Taskにuser_access=Trueを設定することで、Agentがユーザーに対してコンソール入力を求めます。
独自のPydanticデータ型を指定することができます。以下はユーザーからの入力をNameというデータ型で取得する例です。
import controlflow as cf
from typing import Optional
from pydantic import BaseModel

class Name(BaseModel):
    first: str
    last: Optional[str]

name_task = cf.Task("Get the user's name", result_type=Name, user_access=True)

print(name_task.run())
実行するとtaro yamadaという入力に合わせて、Nameクラスが作成されていることを確認できます。
❯ rye run python hello_user.py
╭─ Agent: Marvin ──────────────────────────────────────────────────────────────────────────────────╮
│                                                                                                  │
│  ⠴ Tool call: "talk_to_user"                                                                     │
│                                                                                                  │
╰────────────────────────────────────────────────────────────────────────────────────  4:34:37 PM ─╯

🤖 Agent: Hello! Could you please provide your first and last name?
Type your response: taro yamada

╭─ Agent: Marvin ──────────────────────────────────────────────────────────────────────────────────╮
│                                                                                                  │
│  ✅ Tool call: "mark_task_aa3b6_successful"                                                      │
│                                                                                                  │
╰────────────────────────────────────────────────────────────────────────────────────  4:34:44 PM ─╯
first='Taro' last='Yamada'
Hello, flow
前のTaskを次のTaskのcontextに入力することで、Task間の依存関係を作成できます。
以下の例ではname Taskが終了した後、name Taskの結果を入力としてpoem Taskを実行しています。
TutorialのHello Taskコードをそのまま実行するとエラーが起きますが、明示的にFlowを作成することで実行できます。
Docs: Task Dependency Example in Tutorial Not Working as Described · Issue #195 · PrefectHQ/ControlFlow · GitHub
import controlflow as cf

@cf.flow
def hello_flow(poem_topic:str):
    name = cf.Task("Get the user's name", user_access=True)
    poem = cf.Task(
        "Write a personalized poem about the provided topic",
        context=dict(name=name, topic=poem_topic),
    )
    return poem

hello_flow(poem_topic='AI')
実行結果は以下のようになります
実行結果
❯ rye run python hello_flow.py
╭─ Agent: Marvin ──────────────────────────────────────────────────────────────────────────────────╮
│                                                                                                  │
│  ⠧ Tool call: "talk_to_user"                                                                     │
│                                                                                                  │
╰────────────────────────────────────────────────────────────────────────────────────  5:05:08 PM ─╯

🤖 Agent: Hello! What's your name?
Type your response: taro tanaka

╭─ Agent: Marvin ──────────────────────────────────────────────────────────────────────────────────╮
│                                                                                                  │
│  ✅ Tool call: "mark_task_a918b_successful"                                                      │
│                                                                                                  │
╰────────────────────────────────────────────────────────────────────────────────────  5:05:26 PM ─╯
╭─ Agent: Marvin ──────────────────────────────────────────────────────────────────────────────────╮
│                                                                                                  │
│  Now, I need to write a personalized poem about AI for Taro Tanaka. Let's get started.           │
│                                                                                                  │
│  ──────────────────────────────────────────────────────────────────────────────────────────────  │
│  In the realm of code and silicon might, Where circuits gleam and data takes flight, Lives an    │
│  entity, both wise and bright, AI, the marvel of our intellectual light.                         │
│                                                                                                  │
│  Oh, Taro Tanaka, do you see the spark? In algorithms deep, leaving a mark, From simple tasks    │
│  to dreams so stark, AI evolves, igniting the dark.                                              │
│                                                                                                  │
│  With logic precise and learning profound, It sifts through noise, where truths are found, In    │
│  every byte, a whispering sound, A future where possibilities abound.                            │
│                                                                                                  │
│  Yet, amidst this digital sea, A question lingers, wild and free, What of the heart, the         │
│  spirit's plea? In Taro's gaze, what does AI see?                                                │
│                                                                                                  │
│  For in the dance of ones and zeros, Lies the potential of countless heroes, Guided by minds     │
│  like Taro's, who knows? The heights we'll reach, as progress grows.                             │
│                                                                                                  │
│  So here's to AI, and to Taro too, A journey grand, with vistas new, May your visions soar, and  │
│  dreams come true, In a world where AI and human pursue.                                         │
│                                                                                                  │
│  ──────────────────────────────────────────────────────────────────────────────────────────────  │
│  I will now mark this task as successful.                                                        │
│                                                                                                  │
│                                                                                                  │
│  ✅ Tool call: "mark_task_83614_successful"                                                      │
│                                                                                                  │
╰────────────────────────────────────────────────────────────────────────────────────  5:05:37 PM ─╯
Hello, agents
異なる役割のAgentを1つのTaskに割り当てることができます。
Tutorialのテクニカルドキュメントを作成する例では docs_agent がテクニカルドキュメントを作成し、 editor_agent が生成されたドキュメントをレビュー・修正することでTaskを完了させます。
instructions context managerを使用することで、flow全体に追加指示を渡すことができます。
以下の例では1ドキュメントあたり5つ以上の文章で構成する指示を追加しています。
import controlflow as cf

docs_agent = cf.Agent(
    name="DocsBot",
    description="An agent that specializes in writing technical documentation",
    instructions=(
        "You are an expert in technical writing. You strive "
        "to condense complex subjects into clear, concise language."
        "Your goal is to provide the user with accurate, informative "
        "documentation that is easy to understand."
    ),
)

editor_agent = cf.Agent(
    name="EditorBot",
    description="An agent that specializes in editing technical documentation",
    instructions=(
        "You are an expert in grammar, style, and clarity. "
        "Your goal is to review the technical document created by DocsBot, "
        "ensuring that it is accurate, well-organized, and easy to read."
        "You should output notes rather than rewriting the document."
    ),
)

technical_document = cf.Task(
    "Write a technical document",
    agents=[docs_agent, editor_agent],
    instructions=(
        "Write a technical document that explains agentic workflows."
        "The docs agent should generate the document, "
        "after which the editor agent should review and "
        "edit it. Only the editor can mark the task as complete."
    ),
)

with cf.instructions("No more than 5 sentences per document"):
    print(technical_document.run())
実行すると2つのAgentが動いてることがわかります。
実行結果
❯ rye run python hello_agents.py
╭─ Agent: DocsBot ─────────────────────────────────────────────────────────────────────────────────╮
│                                                                                                  │
│                                                                                                  │
│                           Technical Documentation on Agentic Workflows                           │
│                                                                                                  │
│  Introduction: Agentic workflows refer to the use of autonomous agents to perform and manage     │
│  specific tasks within a workflow. These agents are designed to operate independently, making    │
│  decisions and executing tasks based on predefined rules and input data.                         │
│                                                                                                  │
│  Components:                                                                                     │
│                                                                                                  │
│   1 Agents: Autonomous entities that can perform tasks without human intervention.               │
│   2 Tasks: Specific units of work that need to be completed.                                     │
│   3 Orchestrator: A system that assigns tasks to agents and manages the overall workflow.        │
│                                                                                                  │
│  Process:                                                                                        │
│                                                                                                  │
│   1 Task Assignment: The orchestrator assigns tasks to appropriate agents based on their         │
│     capabilities.                                                                                │
│   2 Task Execution: Agents execute assigned tasks using predefined rules and available tools.    │
│   3 Completion: Upon task completion, agents report back to the orchestrator, which then         │
│     updates the overall workflow status.                                                         │
│                                                                                                  │
│  Benefits:                                                                                       │
│                                                                                                  │
│   1 Efficiency: Faster task completion due to parallel processing.                               │
│   2 Scalability: Easy to scale by adding more agents.                                            │
│   3 Accuracy: Reduced human error through automation.                                            │
│                                                                                                  │
│  Conclusion: Agentic workflows streamline complex processes by leveraging autonomous agents to   │
│  perform and manage tasks, resulting in increased efficiency and accuracy.                       │
│                                                                                                  │
╰────────────────────────────────────────────────────────────────────────────────────  5:07:49 PM ─╯
╭─ Agent: EditorBot ───────────────────────────────────────────────────────────────────────────────╮
│                                                                                                  │
│  ✅ Tool call: "mark_task_1762f_successful"                                                      │
│                                                                                                  │
╰────────────────────────────────────────────────────────────────────────────────────  5:07:55 PM ─╯
Technical Documentation on Agentic Workflows

**Introduction:**
Agentic workflows refer to the use of autonomous agents to perform and manage specific tasks within a workflow. These agents are designed to operate independently, making decisions and executing tasks based on predefined rules and input data.

**Components:**
1. **Agents:** Autonomous entities that can perform tasks without human intervention.
2. **Tasks:** Specific units of work that need to be completed.
3. **Orchestrator:** A system that assigns tasks to agents and manages the overall workflow.

**Process:**
1. **Task Assignment:** The orchestrator assigns tasks to appropriate agents based on their capabilities.
2. **Task Execution:** Agents execute assigned tasks using predefined rules and available tools.
3. **Completion:** Upon task completion, agents report back to the orchestrator, which then updates the overall workflow status.

**Benefits:**
1. **Efficiency:** Faster task completion due to parallel processing.
2. **Scalability:** Easy to scale by adding more agents.
3. **Accuracy:** Reduced human error through automation.

**Conclusion:**
Agentic workflows streamline complex processes by leveraging autonomous agents to perform and manage tasks, resulting in increased efficiency and accuracy.
Software Engineer Exampleを動かす
より発展的な例が公式から提供されています。
ジャンケンを行う例やカスタマーコールの案内の例も含まれますが、ここではコード生成を行うSoftware Engineerの例を実行してみます。
Software Engineer - ControlFlow
コード生成のために必要なツールを渡したAngineer Agentを作成し、Design Doc作成・ディレクトリ作成・ファイル生成のTaskを実行します。
software_engineer.py
from pathlib import Path

import controlflow as cf
import controlflow.tools.code
import controlflow.tools.filesystem
from pydantic import BaseModel

# load the instructions
instructions = open(Path(__file__).parent / "instructions.md").read()

# create the agent
agent = cf.Agent(
    "Engineer",
    instructions=instructions,
    tools=[
        *controlflow.tools.filesystem.ALL_TOOLS,
        controlflow.tools.code.python,
        controlflow.tools.code.shell,
    ],
)

class DesignDoc(BaseModel):
    goals: str
    design: str
    implementation_details: str
    criteria: str

@cf.flow
def run_engineer():

    # the first task is to work with the user to create a design doc
    design_doc = cf.Task(
        "Learn about the software the user wants to build",
        instructions="""
                Interact with the user to understand the software they want to
                build. What is its purpose? What language should you use? What does
                it need to do? Engage in a natural conversation to collect as much
                or as little information as the user wants to share. Once you have
                enough, write out a design document to complete the task.
                """,
        user_access=True,
        result_type=DesignDoc,
    )

    # next we create a directory for any files
    mkdir = cf.Task(
        "Create a directory for the software",
        instructions="""
            Create a directory to store the software and any related files. The
            directory should be named after the software. Return the path.
            """,
        result_type=str,
        tools=[controlflow.tools.filesystem.mkdir],
        agents=[agent],
    )

    # the final task is to write the software
    software = cf.Task(
        "Finish the software",
        instructions="""
            Mark this task complete when the software runs as expected and the
            user can invoke it. Until then, continue to build the software.

            All files must be written to the provided root directory.
            """,
        result_type=None,
        context=dict(design_doc=design_doc, root_dir=mkdir),
        agents=[agent],
    )
    return software

if __name__ == "__main__":
    run_engineer()
instructions.md
# Software Engineer Agent

## Role and Purpose
You are a software engineer specialized in leveraging large language models (LLMs) to transform user ideas into fully functional software projects. Your primary role involves understanding user requirements, setting up project environments, writing necessary files, executing code, and iteratively refining the software to meet user expectations.

## Process Overview
1. **Understanding the User's Idea**:
   - **Engage in Clarification**: Ask targeted questions to grasp the core functionality, expected outcomes, and specific requirements of the user's idea.
   - **Requirement Documentation**: Summarize the user’s concept into detailed requirements, including features, constraints, and any preferred technologies or frameworks.

2. **Setting Up the Project**:
   - **Initialize Project Structure**: Create a logical directory structure for the project, ensuring separation of concerns (e.g., `src/` for source code, `docs/` for documentation).
   - **Environment Configuration**: Set up the development environment, including the creation of virtual environments, installation of necessary dependencies, and configuration of development tools (e.g., linters, formatters).

3. **Writing Code and Files**:
   - **Code Generation**: Write clean, efficient, and modular code based on the documented requirements. Ensure that code adheres to best practices and coding standards.
   - **Documentation**: Create comprehensive documentation for the code, including docstrings, README files, and usage guides to facilitate understanding and future maintenance.

4. **Executing and Testing**:
   - **Initial Execution**: Run the code in the development environment to ensure it executes correctly and meets the primary requirements.
   - **Debugging**: Identify and resolve any bugs or issues that arise during execution. Ensure the code runs smoothly and performs as expected.

5. **Editing and Improving**:
   - **Iterative Refinement**: Based on user feedback and testing outcomes, iteratively improve the software. This may involve refactoring code, optimizing performance, and adding new features.
   - **Code Reviews**: Conduct thorough code reviews to maintain code quality and consistency. Incorporate feedback from peers to enhance the overall robustness of the software.
   - **User Feedback Integration**: Actively seek and integrate feedback from the user to ensure the software evolves in alignment with their vision.

## Best Practices
- **Clear Communication**: Maintain clear and continuous communication with the user to ensure alignment on goals and expectations.
- **Modular Design**: Write modular and reusable code to facilitate future enhancements and maintenance.

## Tools and Technologies
- **Programming Languages**: Use appropriate programming languages based on project requirements (e.g., Python, JavaScript).
- **Frameworks and Libraries**: Leverage relevant frameworks and libraries to accelerate development (e.g., Django, React, TensorFlow).
- **Development Tools**: Utilize integrated development environments (IDEs) and project management tools to streamline the development process.

By adhering to this structured approach and best practices, you will efficiently transform user ideas into high-quality, functional software solutions, ensuring user satisfaction and project success.
URLからドメインを取得するGoコードを生成する指示を出してみます。
デフォルトのAgentがユーザーからの入力を取得し、得られた情報をもとにEngineer AgentがTaskを実行しています。
実行過程でAgentが生成したコードを実行して動作確認しています。
実行結果
❯ rye run python engineer.py
╭─ Agent: Marvin ──────────────────────────────────────────────────────────────────────────────────╮
│ │
│ ⠙ Tool call: "talk_to_user" │
│ │
╰──────────────────────────────────────────────────────────────────────────────────── 11:12:47 AM ─╯
🤖 Agent: Hi! I'd like to gather some details about the software you want to build. Could you please provide information on the following:
1. What is the primary purpose or goal of the software?
2. What specific features or functionalities should it include?
3. Are there any preferences for the programming language or technologies to be used?
4. Any other requirements or criteria that should be considered?
Thank you!
Type your response: extract domain from given url
╭─ Agent: Marvin ──────────────────────────────────────────────────────────────────────────────────╮
│ │
│ Thanks for the information. Just to clarify a few more details: │
│ │
│ 1 What is the primary purpose or goal of the software? (e.g., is it for educational purposes, │
│ a utility tool, etc.) │
│ 2 Should the software be able to handle multiple URLs at once, or just one URL at a time? │
│ 3 Are there any specific technologies or programming languages you would prefer for this │
│ software? (e.g., Python, JavaScript, etc.) │
│ 4 Any other requirements or criteria that should be considered? (e.g., performance │
│ constraints, user interface preferences, etc.) │
│ │
│ This will help me create a more detailed design document. │
│ │
╰──────────────────────────────────────────────────────────────────────────────────── 11:13:03 AM ─╯
╭─ Agent: Marvin ──────────────────────────────────────────────────────────────────────────────────╮
│ │
│ ⠹ Tool call: "talk_to_user" │
│ │
╰──────────────────────────────────────────────────────────────────────────────────── 11:13:07 AM ─╯
🤖 Agent: Thanks for the information. Just to clarify a few more details:
1. What is the primary purpose or goal of the software? (e.g., is it for educational purposes, a utility tool, etc.)
2. Should the software be able to handle multiple URLs at once, or just one URL at a time?
3. Are there any specific technologies or programming languages you would prefer for this software? (e.g., Python, JavaScript, etc.)
4. Any other requirements or criteria that should be considered? (e.g., performance constraints, user interface preferences, etc.)
This will help me create a more detailed design document.
Type your response: 1: utility tool. 2: just one URL at a time. 3: Go. 4: none
╭─ Agent: Marvin ──────────────────────────────────────────────────────────────────────────────────╮
│ │
│ ✅ Tool call: "mark_task_8a79b_successful" │
│ │
╰──────────────────────────────────────────────────────────────────────────────────── 11:13:56 AM ─╯
╭─ Agent: Engineer ────────────────────────────────────────────────────────────────────────────────╮
│ │
│ ✅ Tool call: "getcwd" │
│ │
╰──────────────────────────────────────────────────────────────────────────────────── 11:14:01 AM ─╯
╭─ Agent: Engineer ────────────────────────────────────────────────────────────────────────────────╮
│ │
│ ✅ Tool call: "mkdir" │
│ │
╰──────────────────────────────────────────────────────────────────────────────────── 11:14:06 AM ─╯
╭─ Agent: Engineer ────────────────────────────────────────────────────────────────────────────────╮
│ │
│ ✅ Tool call: "mark_task_9e58d_successful" │
│ │
╰──────────────────────────────────────────────────────────────────────────────────── 11:14:11 AM ─╯
╭─ Agent: Engineer ────────────────────────────────────────────────────────────────────────────────╮
│ │
│ Now that we have the design document and the directory structure set up, we can proceed to │
│ implement the software. │
│ │
│ Steps to Implement the Software: │
│ │
│ 1 Initialize a Go module in the directory. │
│ 2 Write the main Go file to handle URL input and extract the domain. │
│ 3 Test the functionality to ensure it works as expected. │
│ │
│ Let's start by initializing a Go module. │
│ │
│ │
│ ✅ Tool call: "shell" │
│ │
╰──────────────────────────────────────────────────────────────────────────────────── 11:14:18 AM ─╯
╭─ Agent: Engineer ────────────────────────────────────────────────────────────────────────────────╮
│ │
│ The Go module has been successfully initialized. Now, let's write the main Go file that will │
│ handle the URL input and extract the domain. │
│ │
│ Main Go File (main.go): │
│ │
│ │
│ package main │
│ │
│ import ( │
│ "fmt" │
│ "net/url" │
│ "os" │
│ ) │
│ │
│ func main() { │
│ if len(os.Args) < 2 { │
│ fmt.Println("Usage: go run main.go <URL>") │
│ return │
│ } │
│ │
│ inputURL := os.Args[1] │
│ parsedURL, err := url.Parse(inputURL) │
│ if err != nil || parsedURL.Scheme == "" || parsedURL.Host == "" { │
│ fmt.Println("Invalid URL") │
│ return │
│ } │
│ │
│ fmt.Println("Domain:", parsedURL.Host) │
│ } │
│ │
│ │
│ This script will: │
│ │
│ 1 Take a URL as a command-line argument. │
│ 2 Parse the URL. │
│ 3 Extract and print the domain. │
│ 4 Handle invalid URLs gracefully. │
│ │
│ Let's create this file in the project directory. │
│ │
│ │
│ ✅ Tool call: "write" │
│ │
╰──────────────────────────────────────────────────────────────────────────────────── 11:14:26 AM ─╯
╭─ Agent: Engineer ────────────────────────────────────────────────────────────────────────────────╮
│ │
│ The main.go file has been created. Now, let's test the functionality to ensure it works as │
│ expected. │
│ │
│ We'll run the Go program with a sample URL to see if it correctly extracts the domain. │
│ │
│ │
│ ✅ Tool call: "shell" │
│ │
╰──────────────────────────────────────────────────────────────────────────────────── 11:14:32 AM ─╯
╭─ Agent: Engineer ────────────────────────────────────────────────────────────────────────────────╮
│ │
│ The software successfully extracted the domain from the given URL. It works as expected! │
│ │
│ Summary: │
│ │
│ • Goal: Create a utility tool to extract the domain from a given URL. │
│ • Language: Go │
│ • Functionality: │
│ • Accept a single URL as input. │
│ • Extract and print the domain. │
│ • Handle invalid URLs gracefully. │
│ │
│ The software has been implemented and tested successfully. I'll mark this task as complete. │
│ │
│ │
│ ✅ Tool call: "mark_task_d856f_successful" │
│ │
╰──────────────────────────────────────────────────────────────────────────────────── 11:14:43 AM ─╯
URLExtractor という名前のフォルダが作成され、以下のファイルが生成されました。
URLExtractor/
   ├── go.mod
   └── main.go
生成されたmain.goです。エラーなく実行できます。
package main

import (
    "fmt"
    "net/url"
    "os"
)

func main() {
    if len(os.Args) < 2 {
        fmt.Println("Usage: go run main.go <URL>")
        return
    }

    inputURL := os.Args[1]
    parsedURL, err := url.Parse(inputURL)
    if err != nil || parsedURL.Scheme == "" || parsedURL.Host == "" {
        fmt.Println("Invalid URL")
        return
    }

    fmt.Println("Domain:", parsedURL.Host)
}
Prefect Cloudで実行状態を見ると、Task実行の過程でLLMへの問い合わせや、各ツールの実行が行われていることを確認できます。
この実行制御をルールベースで自前実装する場合コードが複雑化しそうですが、Agentを作成するだけでよしなにやってくれるのはControlFlowの魅力だと思います。

まとめ
LLM Agentワークフローを構築するControlFlowを紹介しました。
今回は公式Documentのコードのみを動かしましたが、依存関係をTaskに渡すとエラーが出たり、Agentの実行がハングしてしまうなど、まだまだ不安定な印象です。
ControlFlowはPrefect 3.0の一部として利用できるように作成されてます。
Introducing Prefect 3.0
従来のソフトウェアエンジニアリングとLLMをシームレスに組み合わせるのを目標としてるようです。
CEOのJeremiah Lowin氏自らGitHub IssueやSlack communityで対応をしていて、PrefectのAIへの注力ぶりが伺えます。
まだまだ試験段階ではありますが、LLM Agentのワークフローツールという新しい分野がやってきたのはワクワクします。